MotionEye Camera
These are the steps I took in order to setup MotionEye on my Raspberry Pi.
Materials
- Raspberry Pi 4 Model B (with charger)
- microSD card with microSD card reader/adapter
- Raspberry Pi Camera Module V2-8 Megapixel (RPI-CAM-V2)
Commands
I first flashed the Raspberry Pi OS (64-bit) on the microSD Card using the Raspberry Pi Imaging software. Before I flashed the image, I hit the following button (shows up after you choose OS):
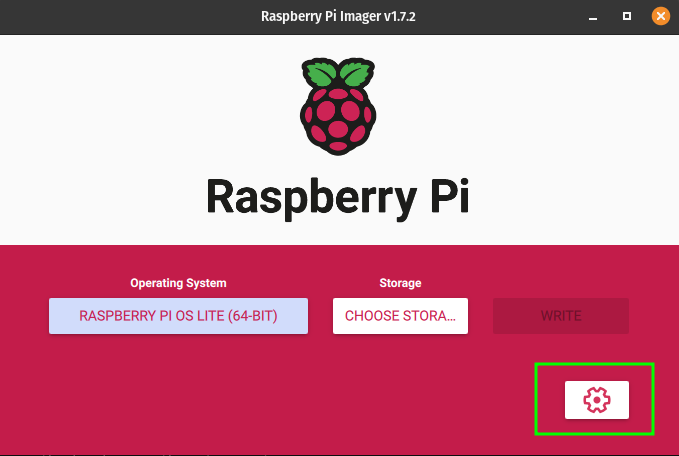
This button will allow you to set Wi-Fi and other settings. I used this to set the default username and password for my system. I then flashed the card. I downloaded Angry IP Scanner and scanned the network. Here I saw all of my devices. I took a note of this for later (using a screenshot), so I can compare that with the hosts after I connect the Pi. After the scan was done, I put my card in the Pi and booted it up. After 2-3 minutes, it showed up on the scan, with port 22 open (you might have to setup port 22 to be recognized in the settings). I then connected on port 22 (SSH) to the Pi, and then ran the following commands (from the website):
#!/bin/bash
#could be run as a bash script
#swtich to sudo user
sudo -i
apt update && apt upgrade -y
#Enable camera in interfaces
raspi-config

apt-get install ffmpeg libmariadb3 libpq5 libmicrohttpd12 -y

mdkir /home/pi/files

cd /home/pi/files

wget https://github.com/Motion-Project/motion/releases/download/release-4.3.2/buster_motion_4.3.2-1_arm64.deb

dpkg -i buster_motion_4.3.2-1_arm64.deb

systemctl stop motion
systemctl disable motion

apt-get install python2 python-dev-is-python2 -y

curl https://bootstrap.pypa.io/pip/2.7/get-pip.py --output get-pip.py
python2 get-pip.py

apt-get install libssl-dev libcurl4-openssl-dev libjpeg-dev zlib1g-dev -y

pip2 install motioneye

#note: If pillow installation fails (hangs and ends at 99%),
#you can install it from official repos using
#apt-get install python-pil -y
#and rerun
#pip2 install motioneye.

mkdir -p /etc/motioneye
cp /usr/local/share/motioneye/extra/motioneye.conf.sample /etc/motioneye/motioneye.conf

mkdir -p /var/lib/motioneye

cp /usr/local/share/motioneye/extra/motioneye.systemd-unit-local /etc/systemd/system/motioneye.service
systemctl daemon-reload
systemctl enable motioneye
systemctl start motioneye

pip install motioneye --upgrade
systemctl restart motioneye
These next commands, I got from https://github.com/motioneye-project/motioneye/wiki/Running-As-Normal-User (Do not run as a script):
#if any command doesnt let you, use sudo for it
mkdir /home/pi/motioneye
cp /etc/motioneye/motioneye.conf /home/pi/motioneye/motioneye.conf

#Edit the /home/pi/motioneye/motioneye.conf file by adjusting the following settings as indicated:
#conf_path /home/pi/motioneye
#run_path /home/pi/motioneye
#log_path /home/pi/motioneye
#media_path /home/pi/motioneye

#For the following I had to actually nano the file and add the content into it
#Edit the init script /etc/init.d/motioneye by adjusting the PIDFILE, USER and OPTIONS variables:
PIDFILE="/home/pi/motioneye/$NAME.pid"
USER="pi"
OPTIONS="startserver -c /home/pi/motioneye/motioneye.conf -l -b"

systemctl daemon-reload
systemctl restart motioneye

sudo -u pi meyectl startserver -b -c /home/pi/motioneye/motioneye.conf

#If you want to change the port (Source: https://www.umpah.net/raspberry-pi-security-cam-installing-motioneye/):
sudo nano /etc/motioneye/motioneye.conf

#Troubleshooting
#checking if the camera is accessible by the Pi (Source: raspberrytips.com):
vcgencmd get_camera
The camera will be accessible on port 8765 (if not changed).